- PHP Basics
- Learn PHP
- PHP Comments
- PHP Data Types
- PHP Variables
- PHP Operators
- PHP echo
- PHP print
- PHP echo vs. print
- PHP if else
- PHP switch
- PHP for Loop
- PHP while Loop
- PHP do...while Loop
- PHP foreach Loop
- PHP break and continue
- PHP exit()
- PHP exit() vs. break
- PHP isset()
- PHP Arrays
- PHP print_r()
- PHP unset()
- PHP Strings
- PHP Functions
- PHP File Handling
- PHP File Handling
- PHP Open File
- PHP Create a File
- PHP Write to File
- PHP Read File
- PHP feof()
- PHP fgetc()
- PHP fgets()
- PHP Close File
- PHP Delete File
- PHP Append to File
- PHP Copy File
- PHP file_get_contents()
- PHP file_put_contents()
- PHP file_exists()
- PHP filesize()
- PHP Rename File
- PHP fseek()
- PHP ftell()
- PHP rewind()
- PHP disk_free_space()
- PHP disk_total_space()
- PHP Create Directory
- PHP Remove Directory
- PHP Get Files/Directories
- PHP Get filename
- PHP Get Path
- PHP filemtime()
- PHP file()
- PHP include()
- PHP require()
- PHP include() vs. require()
- PHP mysqli Tutorial
- PHP mysqli Tutorial
- PHP and MySQL Setup
- PHP mysqli: Create Database
- PHP mysqli: Create Table
- PHP mysqli: Insert Record
- PHP mysqli: Update Record
- PHP mysqli: Fetch Record
- PHP mysqli: Delete Record
- PHP mysqli: SignUp Page
- PHP mysqli: LogIn Page
- PHP mysqli: Store User Data
- PHP mysqli Functions
- PHP mysqli_connect()
- PHP mysqli_close()
- PHP mysqli_connect_errno()
- PHP mysqli_connect_error()
- PHP mysqli_query()
- PHP mysqli_fetch_row()
- PHP mysqli_fetch_assoc()
- PHP mysqli_fetch_array()
- PHP mysqli_free_result()
- PHP mysqli_error()
- PHP mysqli_prepare()
- PHP mysqli_stmt_bind_param()
- PHP mysqli_stmt_execute()
- PHP mysqli_stmt_fetch()
- PHP mysqli_stmt_store_result()
- PHP mysqli_stmt_num_rows()
- PHP mysqli_stmt_bind_result()
- PHP mysqli_stmt_get_result()
- PHP mysqli_result class
- PHP mysqli_report()
- PHP error_reporting()
- PHP mysqli_real_escape_string()
- PHP htmlspecialchars()
- PHP Misc Topics
- PHP Object Oriented
- PHP new Keyword
- PHP header()
- PHP getallheaders()
- PHP Cookies
- PHP Sessions
- PHP Date and Time
- PHP GET vs. POST
- PHP File Upload
- PHP Image Processing
PHP and MySQL Setup
Setting up PHP and MySQL can be an intimidating task for novice web developers. Step-by-step instructions for installing PHP and MySQL on your local development environment are provided in this blog post. At the conclusion of this tutorial, you will have a fully functional PHP and MySQL environment on which you can build and test web applications. This guide will provide you with the knowledge and tools necessary to get started with "PHP mysqli."
To run a PHP script, you need a web server. And to work with databases, you need a database server.
So you have two options: either install PHP and MySQL separately or just install one software package like "XAMPP" that comes with all the necessary tools like a local server, a database server, etc.
In this series of PHP with mysqli tutorial, I am going to use XAMPP, which comes with both Apache and a MySQL server.
The reason I am going to use XAMPP is because of these:
- Convenience: XAMPP comes pre-configured and ready to use with all the required tools, including Apache, MySQL, and PHP.
- Simple installation: XAMPP is made to be simple to install and use, even for beginners. Once installed, XAMPP can be started and stopped with just a few mouse clicks. The installation procedure is simple. This step is covered right after this section.
- Cross-platform compatibility: XAMPP is a flexible option that can be used on a variety of machines because it is available for both Windows and Linux operating systems.
- Open source: XAMPP is free to use and can be customized to meet the needs of specific users or organizations because it is an open source program.
- Numerous resources are available online for troubleshooting and getting assistance with any problems that may arise thanks to the large and active user community that XAMPP has.
XAMPP step-by-step setup guide
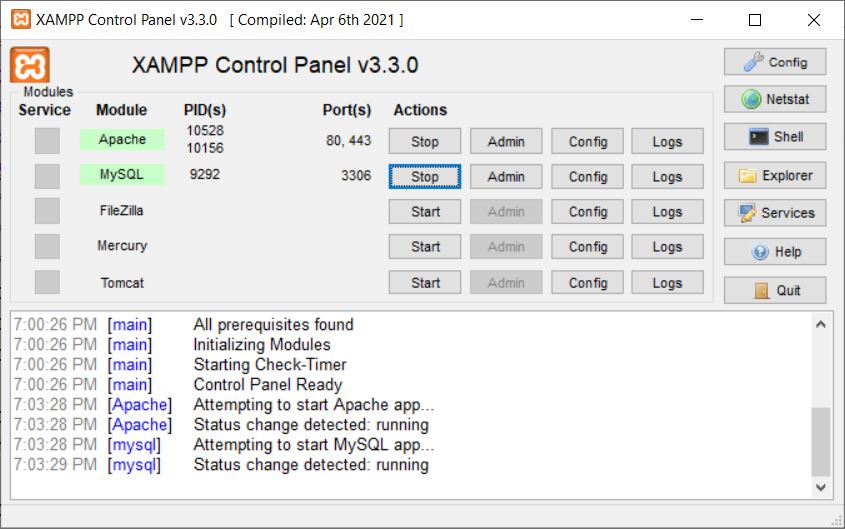
Download and install XAMPP from the Internet. Then open it (XAMPP Control Panel), and in the window you will see:

Click on the "Start" button next to "Apache" to start the Apache web server. Now we can execute PHP scripts.
Click on the "Start" button next to "MySQL" to start the MySQL database server. Now we can work with databases using the PHP script.
Here is the snapshot after starting both:
However, you can also approach this another way to setup the PHP and MySQL environments for your system. That is, you can download and install PHP first from the website: https://www.php.net/downloads.php.
Then download and install MySQL from the website: https://dev.mysql.com/downloads/mysql/.
And finally, configure PHP to work with MySQL. So to configure PHP, in a text editor, open the php.ini file (located in your PHP installation directory). Remove the following
comment:
extension=mysqli.dll
extension=mysqli.so
Restart the web server after saving the changes.
One more thing that is recommended to mention before closing the discussion regarding this post is that, after downloading the PHP, select the components you want to install and launch the installer. The default settings are adequate for the majority of uses.
Then select the directory in which PHP should be installed. Usually, using the default directory is fine.
And finally, set the web server's options. You must include the following lines in your httpd.conf file if you're using Apache:
LoadModule php7_module "c:/php/php7apache2_4.dll"
AddHandler application/x-httpd-php .php
PHPIniDir "C:/php"
Once again, I'm willing to tell you that you should prefer "XAMPP" instead of wasting time on such an installation.
Now that everything is set, it is time to create a database, which is explained in the next post or tutorial.
« Previous Tutorial Next Tutorial »