- PHP Basics
- Learn PHP
- PHP Comments
- PHP Data Types
- PHP Variables
- PHP Operators
- PHP echo
- PHP print
- PHP echo vs. print
- PHP if else
- PHP switch
- PHP for Loop
- PHP while Loop
- PHP do...while Loop
- PHP foreach Loop
- PHP break and continue
- PHP exit()
- PHP exit() vs. break
- PHP isset()
- PHP Arrays
- PHP print_r()
- PHP unset()
- PHP Strings
- PHP Functions
- PHP File Handling
- PHP File Handling
- PHP Open File
- PHP Create a File
- PHP Write to File
- PHP Read File
- PHP feof()
- PHP fgetc()
- PHP fgets()
- PHP Close File
- PHP Delete File
- PHP Append to File
- PHP Copy File
- PHP file_get_contents()
- PHP file_put_contents()
- PHP file_exists()
- PHP filesize()
- PHP Rename File
- PHP fseek()
- PHP ftell()
- PHP rewind()
- PHP disk_free_space()
- PHP disk_total_space()
- PHP Create Directory
- PHP Remove Directory
- PHP Get Files/Directories
- PHP Get filename
- PHP Get Path
- PHP filemtime()
- PHP file()
- PHP include()
- PHP require()
- PHP include() vs. require()
- PHP mysqli Tutorial
- PHP mysqli Tutorial
- PHP and MySQL Setup
- PHP mysqli: Create Database
- PHP mysqli: Create Table
- PHP mysqli: Insert Record
- PHP mysqli: Update Record
- PHP mysqli: Fetch Record
- PHP mysqli: Delete Record
- PHP mysqli: SignUp Page
- PHP mysqli: LogIn Page
- PHP mysqli: Store User Data
- PHP mysqli Functions
- PHP mysqli_connect()
- PHP mysqli_close()
- PHP mysqli_connect_errno()
- PHP mysqli_connect_error()
- PHP mysqli_query()
- PHP mysqli_fetch_row()
- PHP mysqli_fetch_assoc()
- PHP mysqli_fetch_array()
- PHP mysqli_free_result()
- PHP mysqli_error()
- PHP mysqli_prepare()
- PHP mysqli_stmt_bind_param()
- PHP mysqli_stmt_execute()
- PHP mysqli_stmt_fetch()
- PHP mysqli_stmt_store_result()
- PHP mysqli_stmt_num_rows()
- PHP mysqli_stmt_bind_result()
- PHP mysqli_stmt_get_result()
- PHP mysqli_result class
- PHP mysqli_report()
- PHP error_reporting()
- PHP mysqli_real_escape_string()
- PHP htmlspecialchars()
- PHP Misc Topics
- PHP Object Oriented
- PHP new Keyword
- PHP header()
- PHP getallheaders()
- PHP Cookies
- PHP Sessions
- PHP Date and Time
- PHP GET vs. POST
- PHP File Upload
- PHP Image Processing
File Upload in PHP with an Example
File upload functionality has become a standard feature of many websites and applications in the digital age. Whether it's images, documents, or videos, file upload allows users to quickly and easily share their content with others.
PHP has long been a popular web development language for creating dynamic websites, and its file upload capabilities are no exception. Developers can create a seamless file upload experience for their users using PHP's robust set of features and functions. So, whether you're creating a social media platform or a document management system, knowing how to upload files in PHP is a must-have skill for any web developer.
In this article, we'll delve into the world of PHP file upload, covering everything from fundamental concepts to advanced techniques, so you can create powerful and user-friendly file upload features for your web applications.
You may need to modify the "php.ini" file depending on your server configuration before you can upload files of a certain size. PHP by default restricts the size of uploaded files to 2MB. If you need to allow users to upload larger files, you can change the following settings in the "php.ini" file:
upload_max_filesize = 10M
post_max_size = 10M
In this illustration, the 10MB upload limit has been set. This value can be changed to suit your requirements. Another thing to clarify is whether the "file_uploads," that is:
file_uploads = On
is set.
PHP file upload example
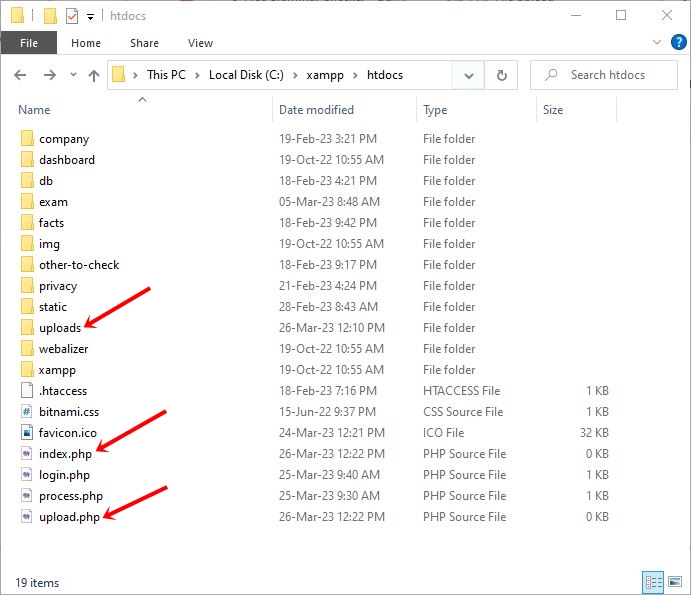
In this section, I'll demonstrate how to upload a file in PHP. So, before we get into the example, let me first explain that we need to create a folder called "uploads" or whatever you want to call it in order to upload all of the files in this separate folder.
I'm going to make two files: one called "index.php" that contains the HTML code for implementing the file upload form, and another called "upload.php" that contains the PHP script that handles the file upload form written in "index.php" and sends or uploads the file to the folder "uploads." Consider the following snapshot to help you understand:
It's time to start writing HTML code for the "index.php" file. I just wrote the following, which is provided below:
<!DOCTYPE html>
<html>
<body>

   <form action="upload.php" method="post" enctype="multipart/form-data">
      Choose an image to upload:
      <input type="file" name="file">
      <input type="submit" value="Upload Image" name="submit">
   </form>

</body>
</html>
The output should be:
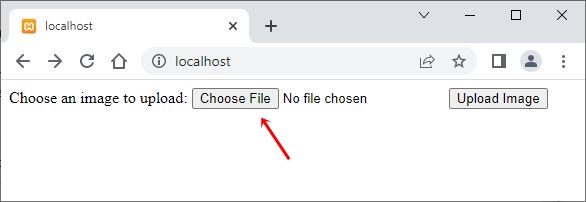
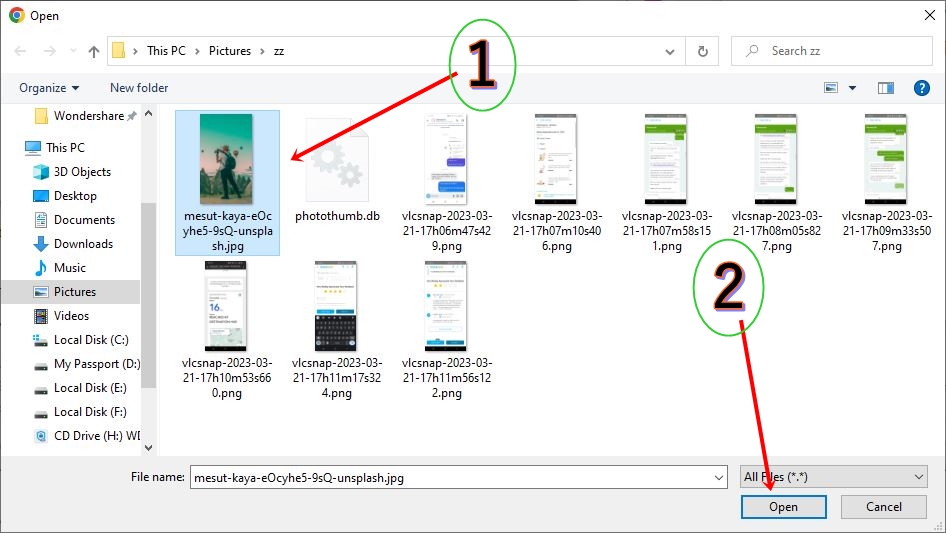
Now, click on the "Choose file" button, select a file, such as an image, and then click on the "Open" or similar type of button, as shown in the screenshot below:
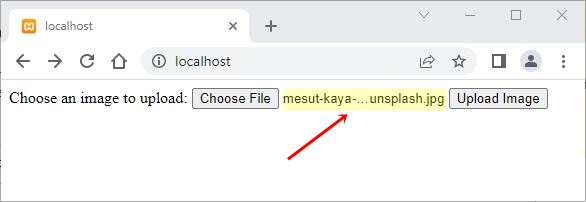
Now that I've selected the file, here's how the output of the file upload form has changed. You can see that the filename I just chose is displayed.
Let's write the PHP script to handle and upload the selected image before clicking the "Upload Image" button. I just wrote the following script for the "upload.php" file:
<?php
$target_dir = "uploads/";
$target_file = $target_dir . basename($_FILES["file"]["name"]);
$imageFileType = strtolower(pathinfo($target_file, PATHINFO_EXTENSION));
// upload file
if (move_uploaded_file($_FILES["file"]["tmp_name"], $target_file)) {
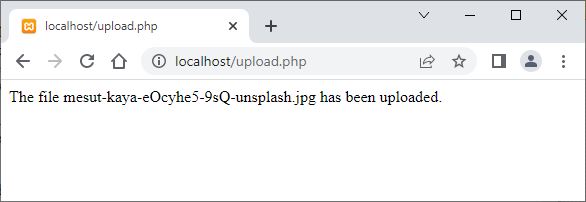
echo "The file ". htmlspecialchars( basename( $_FILES["file"]["name"])). " has been uploaded.";
} else {
echo "There was an error while uploading your file.";
}
?>
When I click on the "Upload Image" file, I am redirected to the "upload.php" page, which uploads the selected file and outputs the following data:
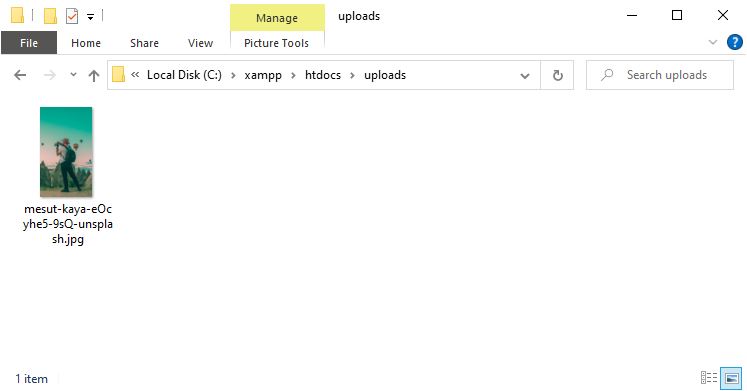
If you open the "uploads" folder, you will find the file there.
File uploads in PHP can be dangerous at times
Before implementing a file upload script in your PHP application, there are several considerations to make:
- Check that the file upload functionality is required for your application and that allowing users to upload files to your server is safe.
- Create appropriate permissions for the target directory where uploaded files will be saved. Make sure the directory is writable but not publicly accessible by the web server user.
- To protect sensitive data, use a secure connection (HTTPS) to transfer files to and from the server.
- Implement security measures such as checking file types and sizes, using file name sanitization, and validating user input to prevent malicious files from being uploaded.
- Test your file upload script thoroughly to ensure that it functions properly and that there are no security flaws.
These considerations, however, are entirely dependent on the requirements. But I'm going to change the "upload.php" script in such a way that it only allows the image file to be uploaded in a specific image file format. It determines whether the file's size is correct. It also determines whether the file already exists, and, then determines the file's size. I modified the "uploads.php" script with these considerations in mind. However, you can still make some other changes based on your needs.
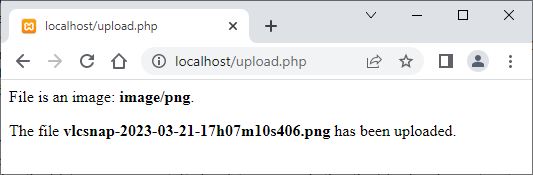
<?php
   $targetDirectory = "uploads/";
   $targetFile = $targetDirectory . basename($_FILES["file"]["name"]);
   $uploadOk = 1;
   $imageFileType = strtolower(pathinfo($targetFile,PATHINFO_EXTENSION));

   // Determine whether the image file is genuine or a fake one.
   if(isset($_POST["submit"])) {
      $check = getimagesize($_FILES["file"]["tmp_name"]);
      if($check !== false) {
         echo "<p>File is an image: <b>" . $check["mime"] . "</b>.</p>";
         $uploadOk = 1;
      } else {
         echo "<p>File is not an image.</p>";
         $uploadOk = 0;
      }
   }

   // Check to see if the file already exists.
   if (file_exists($targetFile)) {
      echo "<p>Sorry, but the file already exists.</p>";
      $uploadOk = 0;
   }

   // Examine the file size
   if ($_FILES["file"]["size"] > 500000) {
      echo "<p>Unfortunately, your file is too large.</p>";
      $uploadOk = 0;
   }

   // Allow specific file formats
   if($imageFileType != "jpg" && $imageFileType != "png" && $imageFileType != "jpeg" && $imageFileType != "gif" ) {
      echo "<p>Only JPG, JPEG, PNG, and GIF files are permitted.</p>";
      $uploadOk = 0;
   }

   // Check if $uploadOk is set to 0 by an error
   if ($uploadOk == 0) {
      echo "<p>Sorry, your file was not uploaded.</p>";
      // If everything is in order, try to upload the file.
   } else {
      if (move_uploaded_file($_FILES["file"]["tmp_name"], $targetFile)) {
         echo "<p>The file <b>". htmlspecialchars( basename( $_FILES["file"]["name"])). "</b> has been uploaded.</p>";
      } else {
         echo "<p>There was an error while uploading your file.</p>";
      }
   }
?>
If you try to upload the output now, you will get the following output if it is successful:
« Previous Tutorial Next Tutorial »