- PHP Basics
- Learn PHP
- PHP Comments
- PHP Data Types
- PHP Variables
- PHP Operators
- PHP echo
- PHP print
- PHP echo vs. print
- PHP if else
- PHP switch
- PHP for Loop
- PHP while Loop
- PHP do...while Loop
- PHP foreach Loop
- PHP break and continue
- PHP exit()
- PHP exit() vs. break
- PHP isset()
- PHP Arrays
- PHP print_r()
- PHP unset()
- PHP Strings
- PHP Functions
- PHP File Handling
- PHP File Handling
- PHP Open File
- PHP Create a File
- PHP Write to File
- PHP Read File
- PHP feof()
- PHP fgetc()
- PHP fgets()
- PHP Close File
- PHP Delete File
- PHP Append to File
- PHP Copy File
- PHP file_get_contents()
- PHP file_put_contents()
- PHP file_exists()
- PHP filesize()
- PHP Rename File
- PHP fseek()
- PHP ftell()
- PHP rewind()
- PHP disk_free_space()
- PHP disk_total_space()
- PHP Create Directory
- PHP Remove Directory
- PHP Get Files/Directories
- PHP Get filename
- PHP Get Path
- PHP filemtime()
- PHP file()
- PHP include()
- PHP require()
- PHP include() vs. require()
- PHP mysqli Tutorial
- PHP mysqli Tutorial
- PHP and MySQL Setup
- PHP mysqli: Create Database
- PHP mysqli: Create Table
- PHP mysqli: Insert Record
- PHP mysqli: Update Record
- PHP mysqli: Fetch Record
- PHP mysqli: Delete Record
- PHP mysqli: SignUp Page
- PHP mysqli: LogIn Page
- PHP mysqli: Store User Data
- PHP mysqli Functions
- PHP mysqli_connect()
- PHP mysqli_close()
- PHP mysqli_connect_errno()
- PHP mysqli_connect_error()
- PHP mysqli_query()
- PHP mysqli_fetch_row()
- PHP mysqli_fetch_assoc()
- PHP mysqli_fetch_array()
- PHP mysqli_free_result()
- PHP mysqli_error()
- PHP mysqli_prepare()
- PHP mysqli_stmt_bind_param()
- PHP mysqli_stmt_execute()
- PHP mysqli_stmt_fetch()
- PHP mysqli_stmt_store_result()
- PHP mysqli_stmt_num_rows()
- PHP mysqli_stmt_bind_result()
- PHP mysqli_stmt_get_result()
- PHP mysqli_result class
- PHP mysqli_report()
- PHP error_reporting()
- PHP mysqli_real_escape_string()
- PHP htmlspecialchars()
- PHP Misc Topics
- PHP Object Oriented
- PHP new Keyword
- PHP header()
- PHP getallheaders()
- PHP Cookies
- PHP Sessions
- PHP Date and Time
- PHP GET vs. POST
- PHP File Upload
- PHP Image Processing
PHP connect_errno and mysqli_connect_errno()
This article is created to cover following two topics of PHP, namely:
Both return the error code (if any) from the last connect call. The only difference is that connect_errno uses PHP mysqli object-oriented script, whereas mysqli_connect_errno() uses PHP mysqli procedural script.
PHP connect_errno
The PHP connect_errno is used when we need to get the error code (if any) from the last connect call. Most of the time, the connect_errno is used to check whether the connection was established successfully or some error occurred before processing further. For example:
<?php
   $servername = "localhost";
   $username = "root";
   $password = "";
   $databasename = "xyz";

   $conn = new mysqli($servername, $username, $password, $databasename);

   if($conn -> connect_errno)
   {
      echo "Failed to establish the connection to the database.";
      exit();
   }
   else
   {
      echo "Connection established successfully!";

      // block of code to process further
   }
   $conn -> close();
?>
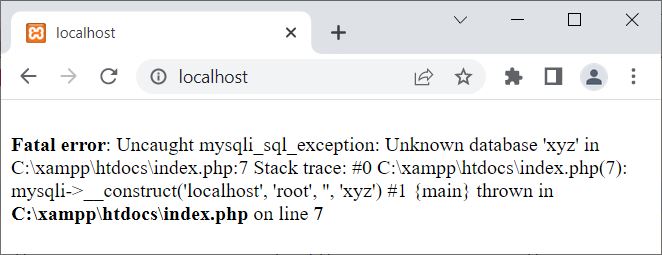
Since the database provided in the above example, named xyz, is not available on my MySQL database server. Therefore, the output produced by the above example is:

I think you may get confused with the above output. That is, you might expect to see the following output:
Failed to establish the connection to the database.
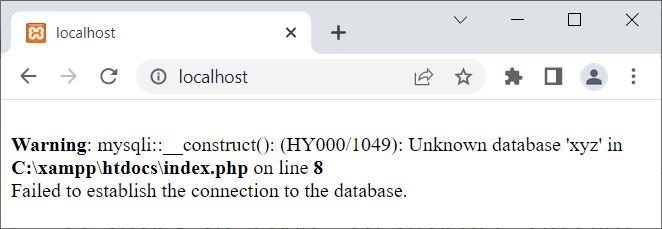
But you are seeing some different output, saying that the database named xyz is not found. This message was raised by default. To hide it, we need to turn off the report mode using MYSQLI_REPORT_OFF before executing or opening a database connection. That is, put the following statements:
$driver = new mysqli_driver();
$driver -> report_mode = MYSQLI_REPORT_OFF;
at the start of the above example. Then the output changed to:

Now to suppress the Warning message, use or put ©right; before new mysqli(). Here is the modified version of the above example:
<?php
   $driver = new mysqli_driver();
   $driver -> report_mode = MYSQLI_REPORT_OFF;

   $servername = "localhost";
   $username = "root";
   $password = "";
   $databasename = "xyz";

   $conn = @new mysqli($servername, $username, $password, $databasename);

   if($conn -> connect_errno)
   {
      echo "Failed to establish the connection to the database.";
      echo "<BR>";
      echo "Error Code: ", $conn -> connect_errno;
      exit();
   }
   else
   {
      echo "Connection established successfully!";

      // block of code to process further
   }
?>
Now the output is:

Note: The mysqli() function is used to open a connection to the MySQL database server in object-oriented style.
Note: The new keyword is used to create a new object.
Note: The exit() function function terminates the execution of the current PHP script.
Note: The mysqli_driver() function is used to modify the error reporting mode in object-oriented style.
Note: The close() function is used to close an opened connection in object-oriented style.
PHP mysqli_connect_errno()
The PHP mysqli_connect_errno() is used when we need to get the error code (if any) from the last connect call in PHP mysqli procedural style. Most of the time, mysqli_connect_errno() is used to check whether the connection was established successfully or some error occurred before processing further. For example:
<?php
   mysqli_report(MYSQLI_REPORT_OFF);

   $servername = "localhost";
   $username = "root";
   $password = "";
   $databasename = "xyz";

   $conn = @mysqli_connect($servername, $username, $password, $databasename);

   if(mysqli_connect_errno())
   {
      echo "Failed to establish the connection to the database.";
      echo "<BR>";
      echo "Error Code: ", mysqli_connect_errno();
      exit();
   }
   else
   {
      echo "Connection established successfully!";

      // block of code to process further
   }
   mysqli_close($conn);
?>
Note: The mysqli_report() function is used to modify the error reporting mode in procedural style.
Note: The mysqli_connect() function is used to open a connection to the MySQL database server in procedural style.
Note: The mysqli_close() function is used to close an opened connection to the MySQL database in procedural style.
« Previous Tutorial Next Tutorial »