- PHP Basics
- Learn PHP
- PHP Comments
- PHP Data Types
- PHP Variables
- PHP Operators
- PHP echo
- PHP print
- PHP echo vs. print
- PHP if else
- PHP switch
- PHP for Loop
- PHP while Loop
- PHP do...while Loop
- PHP foreach Loop
- PHP break and continue
- PHP exit()
- PHP exit() vs. break
- PHP isset()
- PHP Arrays
- PHP print_r()
- PHP unset()
- PHP Strings
- PHP Functions
- PHP File Handling
- PHP File Handling
- PHP Open File
- PHP Create a File
- PHP Write to File
- PHP Read File
- PHP feof()
- PHP fgetc()
- PHP fgets()
- PHP Close File
- PHP Delete File
- PHP Append to File
- PHP Copy File
- PHP file_get_contents()
- PHP file_put_contents()
- PHP file_exists()
- PHP filesize()
- PHP Rename File
- PHP fseek()
- PHP ftell()
- PHP rewind()
- PHP disk_free_space()
- PHP disk_total_space()
- PHP Create Directory
- PHP Remove Directory
- PHP Get Files/Directories
- PHP Get filename
- PHP Get Path
- PHP filemtime()
- PHP file()
- PHP include()
- PHP require()
- PHP include() vs. require()
- PHP mysqli Tutorial
- PHP mysqli Tutorial
- PHP and MySQL Setup
- PHP mysqli: Create Database
- PHP mysqli: Create Table
- PHP mysqli: Insert Record
- PHP mysqli: Update Record
- PHP mysqli: Fetch Record
- PHP mysqli: Delete Record
- PHP mysqli: SignUp Page
- PHP mysqli: LogIn Page
- PHP mysqli: Store User Data
- PHP mysqli Functions
- PHP mysqli_connect()
- PHP mysqli_close()
- PHP mysqli_connect_errno()
- PHP mysqli_connect_error()
- PHP mysqli_query()
- PHP mysqli_fetch_row()
- PHP mysqli_fetch_assoc()
- PHP mysqli_fetch_array()
- PHP mysqli_free_result()
- PHP mysqli_error()
- PHP mysqli_prepare()
- PHP mysqli_stmt_bind_param()
- PHP mysqli_stmt_execute()
- PHP mysqli_stmt_fetch()
- PHP mysqli_stmt_store_result()
- PHP mysqli_stmt_num_rows()
- PHP mysqli_stmt_bind_result()
- PHP mysqli_stmt_get_result()
- PHP mysqli_result class
- PHP mysqli_report()
- PHP error_reporting()
- PHP mysqli_real_escape_string()
- PHP htmlspecialchars()
- PHP Misc Topics
- PHP Object Oriented
- PHP new Keyword
- PHP header()
- PHP getallheaders()
- PHP Cookies
- PHP Sessions
- PHP Date and Time
- PHP GET vs. POST
- PHP File Upload
- PHP Image Processing
PHP Image Processing
Images can be processed easily using PHP. You are going to learn how to use PHP to process images in this post.
Process uploading an image using PHP
As you have already learned how to upload any file using PHP in a previous post, we will not talk about that. Here we will only talk about the correct way to process any image file using PHP before saving it on the server or inside your computer system. So consider the following example. I used comments to describe all the necessary lines of code in the following example.
<?php
/*
   Declaring and initializing
   the $error variable with null.
   This variable stores any error messages generated
   during image processing.
*/
$error = null;

/*
   Determine whether the HTTP request method is POST.
   If it is not POST,
   the script does nothing and keeps loading the HTML page.
*/
if ($_SERVER["REQUEST_METHOD"] === "POST") {
   /*
      Determine whether or not the uploaded file
      is empty if the HTTP request method is POST.
      It sets an error message in the $error variable if it is empty.
   */
    if (empty($_FILES['ImageToProcess'])) {
        $error = "Image is required before doing processing using PHP.";
    } else {
       /*
           If the uploaded file is not empty, retrieve
           its temporary name and specifies the destination directory
           where the file should be processed and saved.
       */
        $tmp_image = $_FILES['ImageToProcess']['tmp_name'];
        $where_to_process_image = "C:/xampp/htdocs/uploads/";

        /*
            Retrieve the uploaded file's original name
            and combines it with the location directory to produce
            a complete path to the file.
        */
        $original_image_name = basename($_FILES['ImageToProcess']['name']);
        $original_image_name_with_directory = $where_to_process_image.$original_image_name;

        /*
            The type of image that will be processed is then determined
            by the script's extraction of the uploaded file's extension.
        */
        $process_image_type = pathinfo($original_image_name_with_directory, PATHINFO_EXTENSION);

        /*
            Now determine whether the submit button was
            actually clicked in order to upload and process the image.
            The script then determines whether the uploaded file
            is an actual image or not if it was clicked.
            If it's not an actual image, the $error variable is set
            with an error message.
        */
        if (isset($_POST['submit'])) {
            $check_image_before_process = getimagesize($_FILES['ImageToProcess']['tmp_name']);
            if ($check_image_before_process === false) {
                $error = "Error before processing the given image.";
            }
        }

        /*
            Determine the size of the uploaded file.
            The $error variable is set with an error message
            if the uploaded file is larger than 10MB.
        */
        $process_image_size = $_FILES['ImageToProcess']['size'];
        if ($process_image_size > 10485760) {
            $error = "Image with size greater than 10MB is not allowed to processs.";
        }

        /*
            Determine whether the uploaded file
            is a jpeg, jpg, or png.
            If it is not, an error message is stored
            in the $error variable.
        */
        if (!in_array($process_image_type, ["jpg", "jpeg", "png"])) {
            $error = "Image other than jpeg, jpg and png is not allowed to process.";
        }

        /*
            Finally, relocate the uploaded file
            to the destination directory.
            If there is an error while moving the file,
            an error message is stored in the $error variable.
        */
        if (!move_uploaded_file($tmp_image, $where_to_process_image.$original_image_name)) {
            $error = "Error occurred in saving the image in your given directory.";
        }
    }
}
?>
<html>
<head>
    <title>PHP Image Processing Example - codescracker</title>
    <style>
        label {
            display: block;
            margin-bottom: 10px;
        }
        input[type="submit"] {
            padding: 5px 10px;
            background-color: #008080;
            color: white;
            border: none;
        }
        .error-message {
            color: red;
            margin-top: 10px;
        }
    </style>
    <script>
        // This function is used to validate the selected image file before submitting the form.
        function validateImage() {
            // Get the element by ID of the input field that is used to upload the image.
            var inputFile = document.getElementById("image-file");

            // Get the file path of the selected image.
            var filePath = inputFile.value;

            // Regular expression for allowed file extensions.
            var allowedExtensions = /(\.jpg|\.jpeg|\.png)$/i;

            if (!allowedExtensions.exec(filePath)) {
                alert('Invalid file type. Please select a JPEG or PNG file.');
                inputFile.value = '';
                return false;
            }

            // Get the size of the selected image file.
            var fileSize = inputFile.files[0].size;
            if (fileSize > 10485760) {
                alert('File size must be less than 10 MB.');
                inputFile.value = '';
                return false;
            }
        }
    </script>
</head>
<body>
    <?php if ($error === null): ?>
        <form method="post" enctype="multipart/form-data" onsubmit="return validateImage()">
            <label for="image-file">Select Image:</label>
            <input type="file" name="ImageToProcess" id="image-file"><br><br>
            <input type="submit" value="Process and Upload Image">
        </form>
    <?php else: ?>
        <p class="error-message"><?= $error ?></p>
    <?php endif; ?>
    <?php if (!empty($original_image_name)): ?>
   <p>Your image is processed and saved successfully.</p>
<?php endif; ?>
</body>
</html>
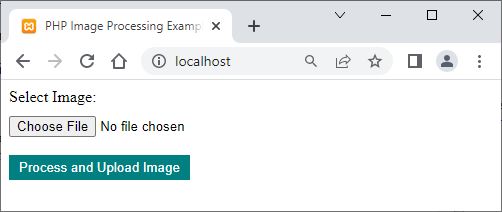
Here is the initial sample output produced by the above example code for image processing using PHP.
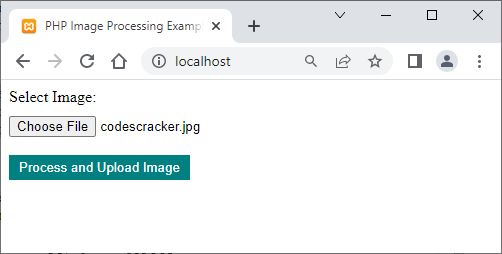
Now to check the demo working of the above example code to see how the above code in PHP can do image processing and save the file inside the computer directory provided in the above example, first choose any image file and click on the Process and Upload Image button.
Here is a sample screenshot after selecting an image file to process and upload.
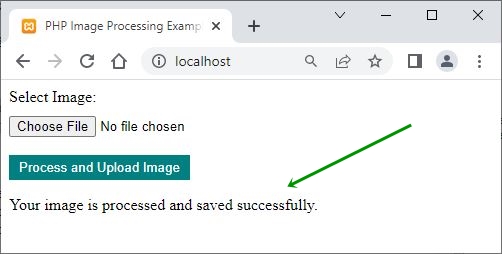
Now click on the Process and Upload Image button. Here is the sample output you will see in your browser if the image file is correct and processed or uploaded successfully.
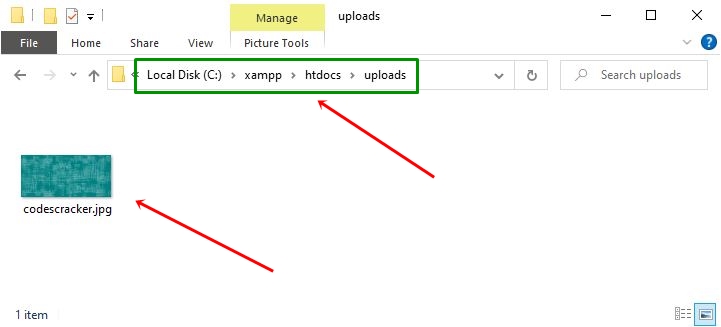
The current image is uploaded, and you can continue uploading other images. Now if you will open the folder where the above action is performed, that is, here "uploads" is the folder name, then you will see the folder contains a file named "codescracker.jpg," which is an image file. Below is a sample screenshot after running the above example.
Because the previous script saves the file with its original name, which could be hazardous. Furthermore, because the example is only for your understanding. You can, however, modify and change the code to suit your needs. To help you understand, you can use the "uniqid()" function to generate a unique file name. So that it can be implemented in the script. All you have to do is add the following statement:
$original_image_name = uniqid('', true) . '_' . $original_image_name;
right above the following code fragment:
if (!move_uploaded_file($tmp_image, $where_to_process_image.$original_image_name)) {
   $error = "Error occurred in saving the image in your given directory.";
}
Other changes you could make include, but are not limited to, checking the directory for existence before attempting the upload operation, checking the MIME type, and so on.
Now that you have learned how to process any uploaded or saved image file at your location, let's learn how to process the image from your computer or server and display it on the web.
Process and Display Image on the Web in PHP
Here's an example of how to use PHP to process and display an image on the web. We will process the above-uploaded image using the example from this PHP image processing tutorial.
<?php
   $process_image_dir = 'uploads/';
   $process_image_name = 'codescracker.jpg';
   $image_with_dir = $process_image_dir.$process_image_name;
?>
<html>
<head>
   <title>Image Processing using PHP Example - codescracker.com</title>
</head>
<body>
<?php
   echo "<img src='$image_with_dir'>";
?>
</body>
</html>
Here is an example of what the above PHP image processing example made.
As you can see from the above screenshot of sample output, the full size of the image is displayed on the web. Now let's modify the above example to see the image at a particular size using CSS.
<?php
$process_image_dir = 'uploads/';
$process_image_name = 'codescracker.jpg';
$image_with_dir = $process_image_dir.$process_image_name;
?>
<html>
<head>
<title>Process and display image on web using PHP</title>
<style>
.imageDimension img{max-width:300px;}
</style>
</head>
<body>
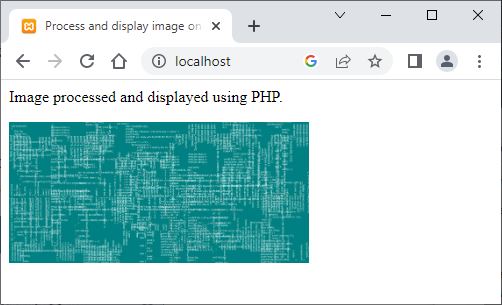
<p>Image processed and displayed using PHP.</p>
<?php
echo "<div class=\"imageDimension\"><img src=\"$image_with_dir\"></div>";
?>
</body>
</html>
Here is the sample output, which you will now see in your browser after modifying the code for processing and displaying any image on the web using PHP.
« Previous Tutorial CodesCracker.com »