- PHP Basics
- Learn PHP
- PHP Comments
- PHP Data Types
- PHP Variables
- PHP Operators
- PHP echo
- PHP print
- PHP echo vs. print
- PHP if else
- PHP switch
- PHP for Loop
- PHP while Loop
- PHP do...while Loop
- PHP foreach Loop
- PHP break and continue
- PHP exit()
- PHP exit() vs. break
- PHP isset()
- PHP Arrays
- PHP print_r()
- PHP unset()
- PHP Strings
- PHP Functions
- PHP File Handling
- PHP File Handling
- PHP Open File
- PHP Create a File
- PHP Write to File
- PHP Read File
- PHP feof()
- PHP fgetc()
- PHP fgets()
- PHP Close File
- PHP Delete File
- PHP Append to File
- PHP Copy File
- PHP file_get_contents()
- PHP file_put_contents()
- PHP file_exists()
- PHP filesize()
- PHP Rename File
- PHP fseek()
- PHP ftell()
- PHP rewind()
- PHP disk_free_space()
- PHP disk_total_space()
- PHP Create Directory
- PHP Remove Directory
- PHP Get Files/Directories
- PHP Get filename
- PHP Get Path
- PHP filemtime()
- PHP file()
- PHP include()
- PHP require()
- PHP include() vs. require()
- PHP mysqli Tutorial
- PHP mysqli Tutorial
- PHP and MySQL Setup
- PHP mysqli: Create Database
- PHP mysqli: Create Table
- PHP mysqli: Insert Record
- PHP mysqli: Update Record
- PHP mysqli: Fetch Record
- PHP mysqli: Delete Record
- PHP mysqli: SignUp Page
- PHP mysqli: LogIn Page
- PHP mysqli: Store User Data
- PHP mysqli Functions
- PHP mysqli_connect()
- PHP mysqli_close()
- PHP mysqli_connect_errno()
- PHP mysqli_connect_error()
- PHP mysqli_query()
- PHP mysqli_fetch_row()
- PHP mysqli_fetch_assoc()
- PHP mysqli_fetch_array()
- PHP mysqli_free_result()
- PHP mysqli_error()
- PHP mysqli_prepare()
- PHP mysqli_stmt_bind_param()
- PHP mysqli_stmt_execute()
- PHP mysqli_stmt_fetch()
- PHP mysqli_stmt_store_result()
- PHP mysqli_stmt_num_rows()
- PHP mysqli_stmt_bind_result()
- PHP mysqli_stmt_get_result()
- PHP mysqli_result class
- PHP mysqli_report()
- PHP error_reporting()
- PHP mysqli_real_escape_string()
- PHP htmlspecialchars()
- PHP Misc Topics
- PHP Object Oriented
- PHP new Keyword
- PHP header()
- PHP getallheaders()
- PHP Cookies
- PHP Sessions
- PHP Date and Time
- PHP GET vs. POST
- PHP File Upload
- PHP Image Processing
PHP feof() function
The PHP feof() function, which stands for "file end-of-file," is used to check whether the file pointer has been reached to the end of the file. For example:
<?php
   $fp = fopen("codescracker.txt", "r");
   while(!feof($fp))
   {
      $line = fgets($fp);
      echo $line;
      echo "<br>";
   }
   fclose($fp);
?>
The output produced by the above PHP example is:

Note: The fopen() function opens a file.
Note: The fgets() function used to read the content of a file, line-by-line.
Note: The fclose() function closes a file.
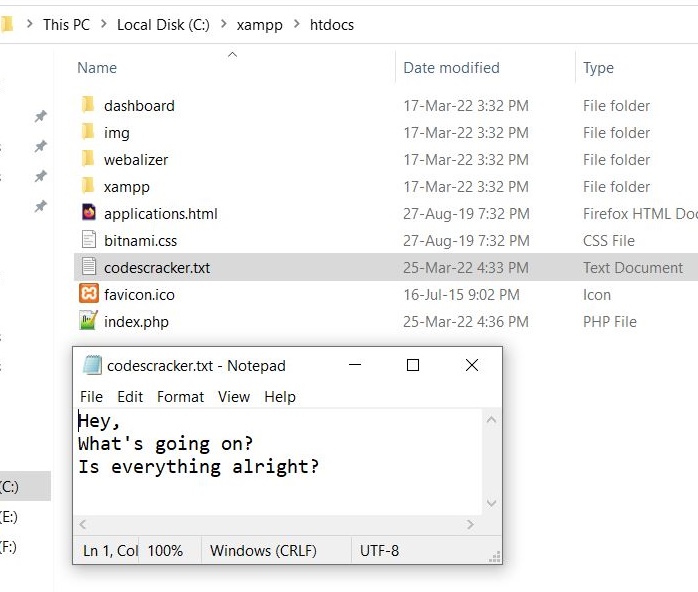
The text you are seeing as the output is the same text that is available in the file codescracker.txt. Here is the snapshot of the opened file, available in the current directory:

Note: The feof() function in PHP is used to go through all the data using a loop. This becomes useful when you do not know the size of the file but still have to read the whole content.
In the preceding example, the PHP code:
while(!feof($fp))
indicates that the loop continues its execution until the file whose pointer is $fp reaches the end of the file.
PHP feof() Syntax
The syntax of the feof() function in PHP is:
feof(filePointer)
PHP feof() Example | Read File until eof
Now let me create the modified version of the above example, since the above example only works if the file exists. And if the file is not available in the current directory, then that example will not work. Here is the modified version of that example:
<?php
   $fp = @fopen("codescracker.txt", "r");
   if($fp)
   {
      while(!feof($fp))
      {
         $line = fgets($fp);
         echo $line;
         echo "<br>";
      }
      fclose($fp);
   }
   else
      echo "<p>Unable to open the file!</p>";
?>
Note: The @ before the fopen() function is used to hide the default error message produced by the function when the file does not exist.
Advantages of the feof() function in PHP
- This simple function checks if a file has reached its end with one line of code.
- Since it only checks if the file is empty, this function is very efficient.
- For large files, this function uses little memory.
- This function can be used with other file functions to perform more complex file operations like reading data until the end.
Disadvantages of the feof() function in PHP
- This function does not provide detailed error messages for file or file handle issues, making troubleshooting difficult.
- This function may behave differently on different platforms or operating systems, affecting end-of-file detection accuracy.
- If there are no more characters to read, this function may return true. This may cause ambiguity.
« Previous Tutorial Next Tutorial »