- Python Basics
- Python Tutorial
- Python Applications
- Python Versions
- Python environment setup
- Python Basic Syntax
- Python end (end=)
- Python sep (sep=)
- Python Comments
- Python Identifiers
- Python Variables
- Python Operators
- Python Ternary Operator
- Python Operator Precedence
- Python Control and Decision
- Python Decision Making
- Python if elif else
- Python Loops
- Python for Loop
- Python while Loop
- Python break Statement
- Python continue Statement
- Python pass Statement
- Python break vs. continue
- Python pass vs. continue
- Python Built-in Types
- Python Data Types
- Python Lists
- Python Tuples
- Python Sets
- Python frozenset
- Python Dictionary
- List vs. Tuple vs. Dict vs. Set
- Python Numbers
- Python Strings
- Python bytes
- Python bytearray
- Python memoryview
- Python Misc Topics
- Python Functions
- Python Variable Scope
- Python Enumeration
- Python import Statement
- Python Modules
- Python operator Module
- Python os Module
- Python Date and Time
- Python Exception Handling
- Python File Handling
- Python Advanced
- Python Classes and Objects
- Python @classmethod Decorator
- Python @staticmethod Decorator
- Python Class vs. Static Method
- Python @property Decorator
- Python Keywords
- Python Keywords
- Python and
- Python or
- Python not
- Python True
- Python False
- Python None
- Python in
- Python is
- Python as
- Python with
- Python yield
- Python return
- Python del
- Python from
- Python lambda
- Python assert
- Python Built-in Functions
- Python All Built-in Functions
- Python print() Function
- Python input() Function
- Python int() Function
- Python len() Function
- Python range() Function
- Python str() Function
- Python ord() Function
- Python chr() Function
- Python read()
- Python write()
- Python open()
- Python Examples
- Python Examples
Python Variables
Variables in Python refer to reserved memory locations and are used to store values. In simple words, we can say that a variable is basically a container for a value used in a program.
Python doesn't provide any commands to declare a variable. The variable is created at the time of assigning a value to it. The type of variable, depends on the type of value assigned to it.
Python is a case-sensitive language. Therefore, "myname" and "myName" are two different variables. For example:
myname = "codescracker"
myName = "codescracker.com"
MyName = "codes cracker"

print(myname)
print(myName)
print(MyName)
The output is:
codescracker
codescracker.com
codes cracker
Note: The type() function is used to find the type of a variable. For example:
x = 10
print(type(x))

x = 10.45
print(type(x))

x = "Python Programming"
print(type(x))

x = True
print(type(x))

x = [12, 23, 453]
print(type(x))
The output is:
<class 'int'>
<class 'float'>
<class 'str'>
<class 'bool'>
<class 'list'>
The variable x belongs to the class int when it holds the value 10. The same variable, that is, x, belongs to the class float when it holds the value 10.45, and so on.
See, the same variable, that is, x, changes its class when a new value of a different type gets initialized to it. Meaning, whatever we initialize as a value for a variable, its type depends on the value's type.
This is a significant advantage of Python over other languages such as Java, C+, C++, and so on. As it doesn't require to declare a variable before its use. Also, a single variable can be used with all types of values.
Similar to this advantage, there are multiple things where Python dominates. In Python, with a smaller number of statements or codes, we can do a similarly large task. Or we can say, use Python to do more with less code.
Variable Naming Rules in Python
The simple rules for naming variables in Python are:
- A variable's name must start with an alphabetic character (A-Z, a-z) or an underscore character (_).
- And the rest of the characters in the variable can be created using alphanumeric characters (A-Z, a-z, 0-9), including an underscore character (_) too.
Examples of some valid variable names in Python
Here is a list of some valid variable names in Python:
- _myval
- myval
- _Myval
- Myval
- my1val
- my_1_val
- myval_
- My_1_Val_2
Python Variable Examples
All the topics about variables in Python are covered. Therefore, now is the time to take some of the examples that may boost your skills with Python. Here is the first example, which demonstrates the assignment of a single value to multiple variables using a single statement:
x = y = z = 500
print(x)
print(y)
print(z)
The output is:
500
500
500
Now let's consider the following example:
a = 10
b = 20
c = 30
d = 40
e = 50

print(a)
print(b)
print(c)
print(d)
print(e)
This or the above program can also be created in the following ways:
a, b, c, d, e = 10, 20, 30, 40, 50

print(a)
print(b)
print(c)
print(d)
print(e)
The output of both programs is:
10
20
30
40
50
Here is another program where multiple values for multiple variables are initialized using, of course, a single statement. Also, the values of all variables are printed using a single print() statement:
a, b, c, d, e = 10, 20, 30, 40, 50

print(a, b, c, d, e)
Now the output of this program is:
10 20 30 40 50
Here's another program that takes user input and stores it in a variable called val, with the variable's value printed back on the output screen:
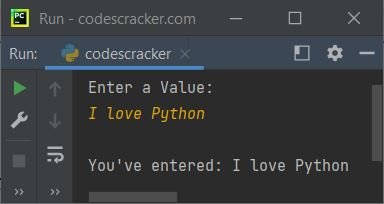
print("Enter a Value: ")
val = input()
print("\nYou've entered:", val)
The snapshot given below shows the sample run of the above program with "I love Python" as user input:
To get the input on the same line as the message, use the end parameter, which skips the insertion of an automatic newline at the end of print().
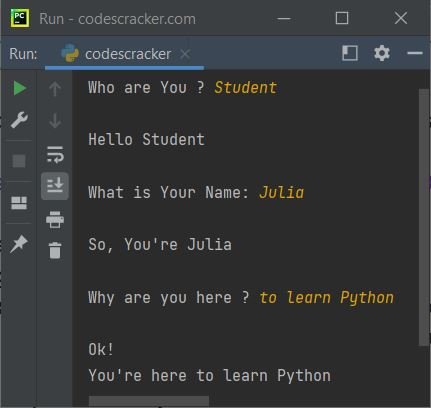
Following is another example that demonstrates the storing of value provided by the user at run-time of the program and printing the value of the variable back on the output screen:
print("Who are You ? ", end="")
x = input()

print("\nHello", x)
print("\nWhat is Your Name: ", end="")
x = input()
print("\nSo, You're", x)

print("\nWhy are you here ? ", end="")
x = input()
print("\nOk!\nYou're here", x)
The sample run with user inputs "Student," "Julia," and "to learn Python" is shown in the snapshot given below:
« Previous Tutorial Next Tutorial »