- Python Basics
- Python Tutorial
- Python Applications
- Python Versions
- Python environment setup
- Python Basic Syntax
- Python end (end=)
- Python sep (sep=)
- Python Comments
- Python Identifiers
- Python Variables
- Python Operators
- Python Ternary Operator
- Python Operator Precedence
- Python Control and Decision
- Python Decision Making
- Python if elif else
- Python Loops
- Python for Loop
- Python while Loop
- Python break Statement
- Python continue Statement
- Python pass Statement
- Python break vs. continue
- Python pass vs. continue
- Python Built-in Types
- Python Data Types
- Python Lists
- Python Tuples
- Python Sets
- Python frozenset
- Python Dictionary
- List vs. Tuple vs. Dict vs. Set
- Python Numbers
- Python Strings
- Python bytes
- Python bytearray
- Python memoryview
- Python Misc Topics
- Python Functions
- Python Variable Scope
- Python Enumeration
- Python import Statement
- Python Modules
- Python operator Module
- Python os Module
- Python Date and Time
- Python Exception Handling
- Python File Handling
- Python Advanced
- Python Classes and Objects
- Python @classmethod Decorator
- Python @staticmethod Decorator
- Python Class vs. Static Method
- Python @property Decorator
- Python Keywords
- Python Keywords
- Python and
- Python or
- Python not
- Python True
- Python False
- Python None
- Python in
- Python is
- Python as
- Python with
- Python yield
- Python return
- Python del
- Python from
- Python lambda
- Python assert
- Python Built-in Functions
- Python All Built-in Functions
- Python print() Function
- Python input() Function
- Python int() Function
- Python len() Function
- Python range() Function
- Python str() Function
- Python ord() Function
- Python chr() Function
- Python read()
- Python write()
- Python open()
- Python Examples
- Python Examples
memoryview in Python
Python is a language that is well known for its speed and performance. That is, while working with large iterations or files, we need to optimize the code to boost the speed and performance. "memoryview" objects come into play here.
The buffer protocol is used by the memoryview to access the binary object's memory without actually copying it. A memoryview object comes under the category of binary sequence types like bytes and bytearray.
What is memoryview in Python?
A memoryview is a generalized NumPy array structure. It allows you to share the memory between data structures without first copying them. It plays an important role in optimizing the efficiency and performance of the program when working with large data sets.
Why memoryview in Python?
The main objective of memoryview in Python is that it allows you to access the internal data of an object. Here, the object must support the buffer protocol. Objects that support the buffer protocol in Python are bytes and bytearray.
Note: A memoryview object can be used to slice data without copying the data underneath.
How do we create a memoryview object in Python?
To create a memoryview object in Python, use the memoryview() constructor as shown in the syntax given below:
memoryview(obj)
Here, obj is an object. This object must support the buffer protocol. The buffer protocol is supported by two built-in objects: bytes and bytearray.
Python memoryview example
Here is a very simple program that shows the benefits of using the memoryview object in Python.
import time

n = 500000
data = b'x' * n
b = data
start = time.time()
while b:
    b = b[1:]
tm = time.time() - start
print("Time taken for", n, "iterations (without memoryview):", tm, "sec")

n = 500000
data = b'x' * n
b = memoryview(data)
start = time.time()
while b:
    b = b[1:]
tm = time.time() - start
print("Time taken for", n, "iterations (with memoryview):", tm, "sec")
The output :

That is, doing it 500000 times without using the memoryview object takes 4.9095458984375 seconds and takes only 0.07810783386230469 seconds when iterated for another 500000 times, but with a memoryview object.
Let's create another program in Python that uses the same approach as the above program to check the number of times it takes to iterate a loop (while loop) for some large number of times without using a memoryview object. After this program, I've created another program with a memoryview object.
import time

for n in (10000, 20000, 30000, 40000, 90000):
    bData = b'codescracker'*n
    start = time.time()
    while bData:
        bData = bData[1:]
    print("Time taken when n is", n, ":", time.time() - start)
The image below displays an example of the output this Python program produced:
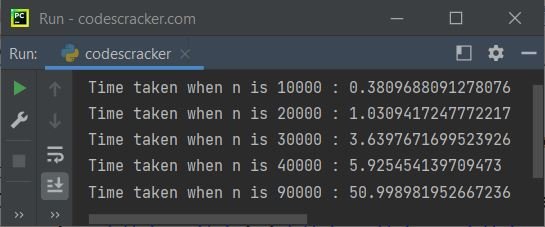
In the above program, first the value 10000 gets initialized to n. And inside the block of code for the for loop, the binary object b'codescracker'*10000, or 10000 times codescracker, gets initialized in the bData variable as a binary object. Now the current time is initialized to the start variable.
And the "while" loop execution was started. This loop continues its execution until the last character of the "bData" variable. Except for the first character, bData[1:] refers to all of them. For the first iteration of the "for" loop, the "while" loop will be iterated n times, or 10,000 times. Similarly, there will be 20000 times when the value of n will be 20000, or for the second iteration of the "for" loop.
After executing all the iterations of the while loop, the time taken to execute all the iterations will be calculated using:
time.time() - start
and printed using the print() statement. See the last time; that was 50 seconds. For that, I've got to wait for 50 seconds to complete the last iteration. Multiplying "codescracker" with 90000 gives a total of 12 * 90000 characters. When we take the traditional approach, iterating each and every character one by one from a total of 1080000 characters will take almost all of our time.But let's do the same thing with a memoryview object.
Here is the same program to iterate the while loop with a memoryview object to calculate and print the time taken for the iterations:
import time

for n in (10000, 20000, 30000, 40000, 90000):
    bData = b'codescracker'*n
    bData = memoryview(bData)
    start = time.time()
    while bData:
        bData = bData[1:]
    print("Time taken when n is", n, ":", time.time() - start)
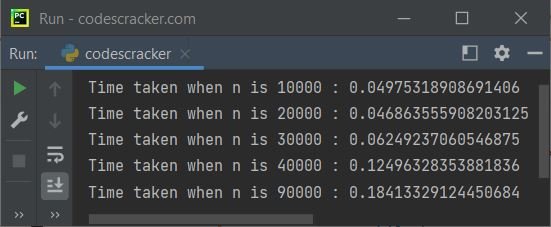
See how the iteration becomes fast when the bData (that has to be iterated) gets converted into a memoryview object. Here is the combined version of both of the above programs with some little modifications:
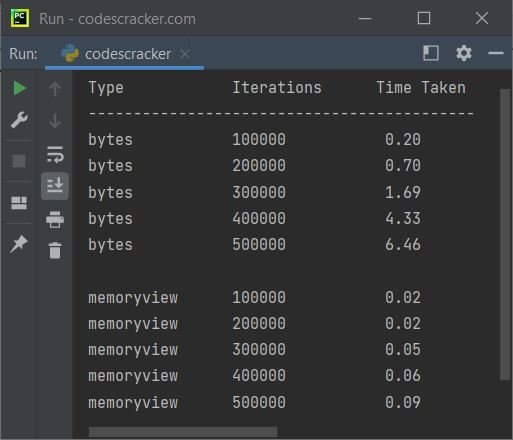
import time

print("Type\t\t\tIterations\t\tTime Taken")
print("-------------------------------------------")

for n in (100000, 200000, 300000, 400000, 500000):
    data = b'x'*n
    start = time.time()
    b = data
    while b:
        b = b[1:]
    end = time.time()
    tm = end - start
    print(f'bytes \t\t\t{n}\t\t\t {tm:0.2f}')

print()

for n in (100000, 200000, 300000, 400000, 500000):
    data = b'x'*n
    start = time.time()
    b = memoryview(data)
    while b:
        b = b[1:]
    end = time.time()
    tm = end - start
    print(f'memoryview  \t{n}\t\t\t {tm:0.2f}')
Here is its sample output:
I don't know how you utilize the memoryview object in your application. But the thing is, this object uses the buffer protocol to access the memory of a binary object without actually copying.
And I think the concept of a memoryview object is clearly described using the notes and example given above. Now let's create an example that prints the value and the type of a memoryview type variable.
x = memoryview(b'codescracker')
print(x)
print(type(x))
The output produced by the above Python program, demonstrating the memoryview object, looks similar to:
<memory at 0x000001BD90E81700>
<class 'memoryview'>
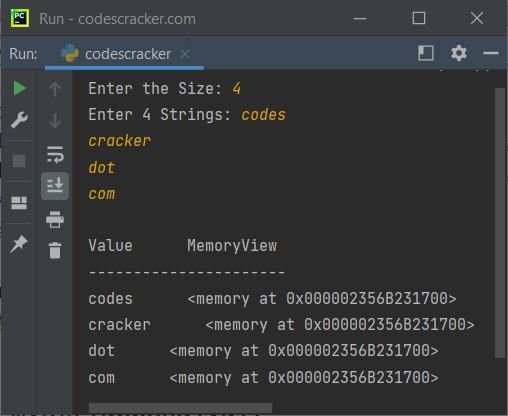
Here is another example on memoryview that allows the user to input the data:
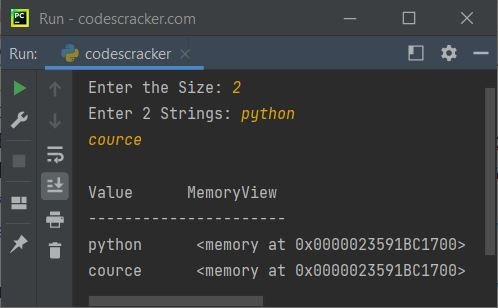
print("Enter the Size: ", end="")
n = int(input())
print("Enter", n, "Strings: ", end="")
mystr = []
for i in range(n):
    val = input()
    mystr.append(val)

print("\nValue      MemoryView")
print("----------------------")
for i in range(n):
    x = bytes(mystr[i], "utf-16")
    print(mystr[i], "    ", memoryview(x))
The snapshot given below shows the sample run of the above program, with user input of size 4 along with codes, cracker, dot, and com as four strings:
Here is another sample run with some other user inputs:
« Previous Tutorial Next Tutorial »